Tuesday, June 24, 2008

Red Velvet Cupcakes - Oh My G!!


Where oh where do i start??!! Okay.. anyone out there passionate about baking, who hasn't made a red velvet cupcake/cake... you have no idea what you are missing! Here's why:
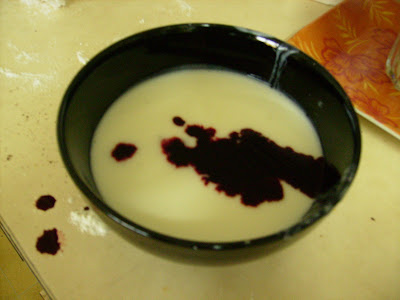
Although red velvet cake is not very chocolaty but it is definitely very delicious. Its the colour that makes all the difference in the world! You can put ant other food colouring, but dude the effect will not be the same - TRUST ME!
The batter turns into this deep radish red/maroon the instant you add the red mixture of buttermilk and food colouring and the it looks just drop dead gorgeous! Pictured below!
The original recipe yielded two 9 inch cakes which you can make instead of cupcakes, but i wanted to make cupcakes since i had promised my cousin that i would make her daughter cupcakes for her birthday (which was in march)! yikes! i guess they're "a little" overdue! But i do i have a good excuse - i had exams!! honest! But i made them the first first opportunity i got.
For frosting a red velvet cake, generally a cream cheese frosting complements it, but i opted for something lighter by using whipped cream. Not a very traditional baker eh?! But I have included the recipe for a cream cheese frosting if you prefer that!
My family including myself eat mostly healthy food that wont clog your arteries and lead to clearly avoidable consequences, so i used skimmed buttermilk and (please oh please don't send me hate mail) but yes i admit it i used margarine and I'm not ashamed to reveal it! I mean to me it's all tomatoes/tomaatoes right?

So anyway here's the recipe:

Red Velvet Cake

§ Ingredients:

1) 2 1/2 cups (250 grams) sifted cake flour

2) 1 teaspoon baking powder

3) 1/2 teaspoon salt

4) 2 tablespoons (15 grams) Dutch-processed cocoa powder

5) 1/2 cup (113 grams) unsalted butter, at room temperature

6) 1 1/2 cups (300 grams) granulated white sugar

7) 2 large eggs

8) 1 teaspoon pure vanilla extract

9) 1 cup (240 ml) buttermilk

10) 2 tablespoons liquid red food coloring

11) 1 teaspoon white distilled vinegar

12) 1 teaspoon baking soda

§ Directions:

1) Preheat oven to 350 degrees F (175 degrees C) and place rack in center of oven. Butter two - 9 inch (23 cm) round cake pans and line the bottoms of the pans with parchment paper. Set aside. (or around 24 cupcakes)

2) Red Velvet Cake: In a mixing bowl sift together the flour, baking powder, salt, and cocoa powder. Set aside.


3) In bowl of your electric mixer, or with a hand mixer, beat the butter until soft (about 1-2 minutes). Add the sugar and beat until light and fluffy (about 2-3 minutes). Add the eggs, one at a time, beating well after each addition. Scrape down the sides of the bowl. Add the vanilla extract and beat until combined.


4) In a measuring cup whisk the buttermilk with the red food coloring. With the mixer on low speed, alternately add the flour mixture and buttermilk, in three additions, beginning and ending with the flour.


5) In a small cup combine the vinegar and baking soda. Allow the mixture to fizz and then quickly fold into the cake batter.


6) Spoon the batter in each hole (or whatever its called). Bake in the preheated oven for approximately 20 - 25minutes (but it really depends on your oven as mine is an ass it took around 30 minutes to bake), or until a toothpick inserted in the center of one of the cakes comes out clean.

7) Let cool for approximately 5 minutes and remove from pan, leave on wire rack to cool before frosting. If using Whipped cream follow the instructions on box (i used dream whip). If opting for a cream cheese frosting the recipe follows.

Cream Cheese Frosting:
Beat 8 oz. cream cheese (Doesn't have to be room temperature) with 5 Tbsp. softened butter and 2 tsp. vanilla until combined. Gradually add 2 cups powdered sugar that has been sifted after measuring. Continue to add more sifted powdered sugar until you reach a consistency and sweetness that you desire.


Again I have to mention, the point of making red velvet cake aside from the marvelous colour is the frosting, the cream cheese frosting to be precise and not the cardboard whipping cream. So if you are not as paranoid as myself you have to can use the cream cheese frosting, and trust me its the better option! I'm regretting not using it! But whatever i saved tonnes of calories, not that it matters! Sorry, but i need counseling - can you tell?! :P


P.S. Ignore my lame sense of humor and just try the deeelicious recipe.


Monday, June 23, 2008

Black Forest Chocolate Cake - Hallelujah!


Hey there, i made this black forest chocolate cake sometime ago (on mothers day to be specific), and it was nothing short of magnificent ( Glorious, Splendid, Superb... you get the picture)! The best thing about this black forest cake aside from the fact that its black forest cake is that its low fat! yes all you 'health conscious' bakers out there! this cake is fat less! well not completely, but it has not butter what so ever! :D:D So yes you can go ahead and have the second helping without feeling (that) guilty!
I got this recipe will browsing a website and I'm not sure which one so i am unable to include the link! anyway the pictures are present so enjoy some food porn!
P.s. ignore the knife! Again this points out my Unprofessional semi-professional photography skills!


Black Forest Chocolate cake

§ Ingredients:

1) 1 (14-ounce) can Fat Free Sweetened Condensed Milk (NOT evaporated milk)

2) 2/3 cup applesauce

3) 2/3 cup packed brown sugar

4) 2 eggs

5) 1 egg white

6) 1 3/4 cups all-purpose flour

7) 3/4 cup unsweetened cocoa

8) 2 teaspoons baking powder

9) 2 teaspoons baking soda

10) 1/2 teaspoon salt

11) 1/2 cup boiling water

12) 1 cup (6-ounces) semi-sweet chocolate chips

13) 1 (21-ounce) can cherry pie filling

§ Directions:

1) Preheat oven 350°F. In medium bowl, combine applesauce, brown sugar, eggs and egg white; mix well.

2) In small bowl, combine dry ingredients; stir into milk mixture just until moistened. Gradually add water. Stir in chocolate chips. Pour into 12-cup fluted tube pan coated with non-stick cooking spray.

3) Bake 35 to 40 minutes or until toothpick inserted near center comes out clean. Cool in pan 15 minutes; remove from pan. Cool for 30 minutes. Spoon some of the pie filling over the cake. Slice cake and serve with remaining filling.

You can also have some whipped cream with the cake! Since its so low in fat you can afford to do so!

Sunday, June 22, 2008

Rich, Fudgy Brownies... need i say more


Hey there, last Monday our neighbour gave birth to a baby girl and i volunteered to bake brownies to take when we visit! original huh?!
anyway this aint the best picture .. since by olympus camera is apparently completely unprofessional! But i do assure you that these are probably the easiest and quikest and simply heavenly brownies you'll ever make! it literally takes maximum 10 minutes to throught everything together and shove it in the oven! In the original recipe the baking time is around 40minutes but due to the slowness of my oven it took my brownies about an hour to reach the delectableness that they were! again dont let the unprofessional pictor fool you these are reaally and i mean reallly good simple/easy/uncomplicated brownies ever!! (do i have you convinced?! :P)
anyway, i do have the pictor from the original website (yumsugar) and i decided to upload that as well since they look so much better than mine. Although mine tasted reallyy good as well and like they say beauty is in the eye of the beholder (or the stupid camera with which you capture it with)! the recipe:

Rich, Fudgy Brownies

Ingredients:

1. 8 oz (1 cup) unsalted butter plus enough softened unsalted butter to grease the pan.
2. 3 oz (2/3 cup) unbleached all-purpose flour plus enough to line the pan.
3. 2 cups granulated sugar.
4. 4 large room temperature eggs [this seriously makes a difference].
5. 1/2 tsp vanilla extract.
6. 2 1/2 oz (3/4 cup) unsweetened cocoa powder.
7. 1/2 tsp baking powder.
8. 1/2 tsp table salt.

Method:

1) Position rack in center of oven and heat to 350F.

2) Butter and flour a 9" square pan, tapping out excess flour. [I decided to use cocoa powder instead of flour.]

3) Melt butter in medium saucepan over medium heat.

4) Remove pan from heat - whisk or stir in sugar, followed by all four eggs and vanilla.

5) Stir in flour, cocoa, baking powder and salt. Go slowly to keep the ingredients from flying out of the pan. Stir until smooth and uniform.

6) Spread batter into prepared baking pan, smoothing so it fills the pan evenly.

7) Bake until a toothpick or skewer comes out clean (there will be a few clumps clinging to it) — this will take about 40 minutes.

8) Let brownies cool completely in the pan on a rack.

Saturday, June 21, 2008

HELLO!

hi and welcome to my blog,
Firstly, because of my undying love of baking/cooking.. but mostly baking and the summer break (because of which i have a whole lotta time on my hand) i decided to post the recipes i try and share the results with whoever is interested in some amateur baking/photography!
Stay tuned will be posting pictures of my endeavors shortly!
Peace,
Your friendly neighborhood semi-professional baker (or something like that) - Abeer