Wednesday, September 10, 2008

Eggplant and green pepper kugel

OLYMPUS DIGITAL CAMERA

A kugel? you may have not heard of it, I hadn't either until I came upon it day before yesterday on www.myrecipes.com .

Traditionally a kugel is made either with potatoes or noodles but this one uses matzo meal (you can substitute this with regular breadcrumbs - I used whole wheat ones that I made at home).

This dish kinda reminded me of a quiche, and it was very delicious and well accepted - the leftovers I used them the next day as filling in puff pastry (very clever if I may add).

Eggplant and green pepper kugel

  • Ingredients:
  1. 1  large eggplant (about 2 pounds)
  2. 2  teaspoons  vegetable oil
  3. 3  cups  finely chopped onion
  4. 1 1/2  cups  finely chopped green bell pepper
  5. 3  tablespoons  pine nuts
  6. 1 1/2  teaspoons  salt
  7. 1/2  teaspoon  freshly ground black pepper
  8. 2  large eggs, lightly beaten
  9. 3/4  cup  matzo meal
  10. Cooking spray
  11. 1  teaspoon  paprika
  • Directions:
  1. Preheat oven to 450°.
  2. Pierce eggplant several times with a fork; place on a foil-lined baking sheet. Bake at 450° for 20 minutes or until tender. Cool slightly; peel and chop. Place in a large bowl.
  3. Heat the oil in a large nonstick skillet over medium-high heat. Add onion, bell pepper, and nuts. Cook 6 minutes or until onion is tender. Add onion mixture, salt, black pepper, and eggs to eggplant; stir well to combine. Add matzo meal; toss gently to combine. Spoon mixture into an 11 x 7-inch baking dish coated with cooking spray. Sprinkle with paprika. Bake at 450° for 35 minutes or until pudding is thoroughly heated and golden brown.

Tuesday, September 9, 2008

Deep fried and smothered in chocolate!

OLYMPUS DIGITAL CAMERA

Ever since I saw  the post at joy the bakers blog regarding doughnuts, I've had an urge to make them. So a couple of days ago I went to her post to get the recipe but found out that The dough had to sit for around 8 hours as it had yeast and I was in no mood to wait 8 hours - I googled quick and easy doughnuts and ended up with this recipe.

Before I initiate my ramblings view on these cuties, I have to tell you about the title of this post - deep fried and smothered in chocolate, does it ring a bell? no? how about when I say its from a movie with a green ogre? well okay maybe I'm the only person who has watched shrek trilogy till all the lyrics, lines and scenes are embedded in my head! So the evil fairy godmother says this in the 2nd movie right after shrek, donkey and cat wreck her factory! And I've always wanted to use this line - and now I have! Thank you.

Okay so when you eat these doughnut balls ( that's what I made) don't be thinking about dunkin' doughnuts , alright?! Moving on to the positive - these are not your typical doughnuts (i.e. light and airy) but they are more like cake doughnuts (which I am a big fan of by the way)!And they can certainly, definitely fix any doughnut craving  instantly! Moreover if you have kids, you will be making these regularly ( My little bro he's 8yrs old loved them! Totally Off topic: Today was his first day in fourth grade he looked sooo adorable in his combed out hair and neatly pressed uniform! I should have taken a picture!!)

Cake Doughnuts

  • Ingredients:

1) ¼ cup Buttermilk

2) 2 tablespoons shortening

3) 1/2 cup white sugar

4) 1 egg

5) 1/2 teaspoon vanilla extract

6) 2 cups sifted all-purpose flour

7) 1/2 teaspoon baking soda

8) 1/4 teaspoon salt

9) 1 quart oil for deep frying

10) 1/2 cup confectioners' sugar for dusting

  • Directions:

1) In a medium bowl, cream together the shortening and sugar until smooth. Beat in the egg and vanilla until well blended. Sift together the flour, baking soda, and salt; stir into the sugar mixture alternating with the vinegar and milk. Roll dough out on a floured surface to 1/3 inch thickness. Cut into doughnuts using a donut cutter. Let stand for about 10 minutes.

3) Heat the oil in a large deep skillet to 375 degrees F (190 degrees C). Fry doughnuts in the hot oil until golden, turning over once. Drain on paper towels. Dust with confectioners' sugar while they are still warm, and serve immediately. (I dipped mine in chocolate icing and put blue sprinkiles on them!)

OLYMPUS DIGITAL CAMERA

Monday, September 8, 2008

Chocolate Pistachio Biscotti - 2 go!

OLYMPUS DIGITAL CAMERA


So let me start by enlightening my dear readers with the ' 2 go ' next to the title of this post. Basically I made these Oh my gawd delicious biscotti to take with me in an airtight container to university. Weird - I know, but since I don't really do store bought cookies I thought this will be a good alternative - till it lasts.

The recipe adapted from www.joyofbaking.com actually called for hazelnuts but my nut of the moment has been pistachio lately so I opted for them instead.

Chocolate Pistachio Biscotti

  • Ingredients:

1) 4 ounces (125 grams) semisweet or bittersweet chocolate, coarsely chopped

2) 1 cup (215 grams) firmly packed light brown sugar

3) 1 3/4 (250 grams) cups all-purpose flour

4) 1/3 cup (30 grams) unsweetened cocoa, preferably Dutch-processed

5) 1 tablespoon (4 grams) instant espresso powder

6) 1 teaspoon (5 grams) baking soda

7) 1/4 teaspoon salt

8) 3 large eggs

9) 1 1/2 teaspoons (6 grams) pure vanilla extract

10) 1 cup (150 grams) Pistachios, toasted.

  • Directions:

1) Preheat oven to 350 degrees F (180 degrees C). To toast Pistachios: spread on a baking sheet and bake for 15 minutes.Cool. Set aside while you prepare the dough.

2) Reduce temperature of oven to 300 degree F (150 degrees C). Line a large baking sheet with parchment paper.

3) In a food processor fitted with a metal blade, combine the coarsely chopped chocolate and brown sugar and process until the chocolate is very fine; set aside.

4) Sift or whisk together the flour, cocoa, espresso powder, baking soda and salt into a bowl; set aside. In the bowl of your electric mixer combine the eggs and vanilla extract and beat to blend, about 30 seconds. On low speed mix in the chocolate/sugar and flour mixtures until a stiff dough forms, adding the pistachios about half way through mixing.

5) Divide the dough in half. Transfer to the baking sheet and drop the dough in the shape of a log using spatula , spacing them well apart (width-wise on the pan), and pat to even the shapes. Bake until almost firm to the touch, about 35 - 40 minutes (logs will spread during baking). Remove from the oven, place on wire rack, and let cool for 10 minutes.

6) Using a long spatula transfer the logs to a cutting board. Using a serrated knife cut the dough into slices 3/4 inch (2 cm) thick on the diagonal. Arrange the slices cut-side down on the baking sheet. Bake 15 minutes. Turn the slices over and bake until crisp and dry, about 15 minutes longer. Remove from oven and let cool on wire rack.

OLYMPUS DIGITAL CAMERA

Sunday, September 7, 2008

Vietnamese Chicken Meatballs

OLYMPUS DIGITAL CAMERA

This may sound slightly odd but yesterday I was craving meatballs! And don't think that I've heard anyone crave meatballs. But anyway that was the case and the above picture was the result.

This Vietnamese recipe is adapted from cooking light: The best of cooking light.

These meatballs where very light and tasted amazing specially with a Thai sweet n sour chili sauce that I just got my hands over.

Recipe:

Ingredients:

1) 1 pound Chicken breast (skinless/boneless)

2) 3 cloves garlic minced.

3) 3 shallots, chopped.

4) Handful of mint and coriander (more of the coriander)

5) 3 Tablespoon Fish Sauce

6)  1 stalk of fresh lemon grass, tender white inner bulb only, minced.

7) 1 1/2 teaspoons cornstarch

8) 1/2 teaspoon kosher salt

9) 1/2 tsp ground black pepper.

10) 1/2 cup sugar

Directions:

1) Preheat oven to 400degrees, line baking sheet with parchment paper. In a food processor pulse the chicken until coarsely chopped, transfer to a bowl. Mix the rest of the ingredients EXEPT the sugar and combine with chicken using your lovely hands.

2) Spread sugar on a plate. Roll the chicken mixture into 1 1/2 inch balls with slightly moistened hands. Arrange on baking sheet and bake for 15 minutes until browned and cooked through.

3) Serve on bed of lettuce with sliced red onion and cucumber. Serve with Asian chili sauce. 

Thursday, September 4, 2008

First Time - Savoury

Carmalized Onion and Eggplant Quiche3

So you might know from reading my last post that its Ramadan, and as per tradition lots of wonderful delicious goodies are made to break the fast with. And I made this quiche yesterday and decided to post it!

Up till now this has been a strictly dessert blog, but I decided to venture out a little bit - experiment.. although I do make fancy stuff for lunch and dinner all the time, but I rarely post them up.

This is a lighter version of the oh soo delicious but not soo light quiche. I was describing it to my best friend (over sms ofcourse) and I told her that this is an 'Abeer friendly' quiche (yes I have issues) :|

Carmalized Onion and Eggplant Quiche2  Caramalized Onion and Eggplant Quiche

Ingredients:

Crust:

1) 1 1/3 cup rolled Oats

2) 2 T Butter

3) 3 T Chilled Water (Approximately)

4) Cooking Spray

Filling:

1) 1 large eggplant, cubed

2) 2 medium onions, diced

3) 4 medium tomatoes, (boil for around 10 min, then peel and chop)

4) 1 tsp dried oregano

5) a handful of chopped parsley

6) 1/2 tsp red chilli flakes

7) Salt and pepper

8) 1/2 cup skimmed milk

9) 2 egg whites (or one egg)

10) 1/4 parmesan cheese (you can put more - don't be precise)

Directions:

Crust:

1) Preheat oven to 375°.

2) To prepare crust, combine oats; cut in butter with a pastry blender or 2 knives until mixture resembles coarse meal. Add water; stir just until moist. Press mixture gently into a 9 inch pie plate coated with cooking spray.

3) Bake at 375° for 7 minutes. Cool on a wire rack.

Filling:

1) Put a little salt on the eggplant and let drain for 1/2 an hour.

2) Heat a little olive oil in a pan, add onion and saute until slighlty caramalized.

3) Add the egg plant and saute for 5 minutes, add tomatoes (juices and all) and the remaining ingredients except for the milk, egg whites and cheese. Let simmer for 5 minutes.

4) Put in Cooled Pie Shell, mix together milk and egg whites and pour over the quiche, top with cheese.

5) Bake in the preheated oven at 400 degrees, for approximately 40 minutes.

6) Enjoy!

Wednesday, September 3, 2008

Good Ol'

OLYMPUS DIGITAL CAMERA

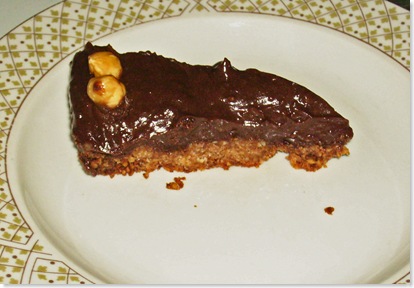
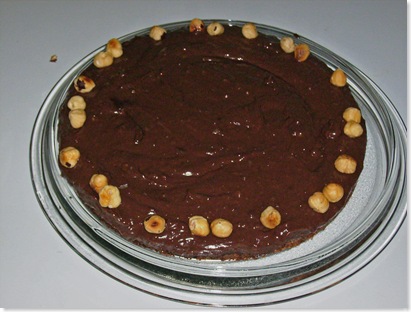
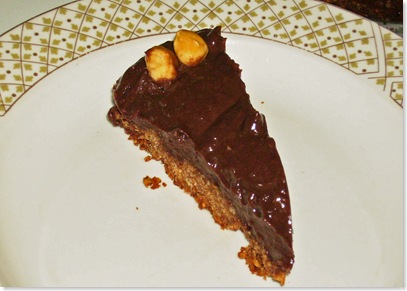
I'm sure anyone reading this will agree that neutella is one of those things that you just cant got wrong with! Its chocolate and hazelnut and apparently tons of sugar thus making it highly addictive!

And any goodies made with this delicacy in it will some how or the other turn it to be incredibly delicious! And when I made this neutella frozen pie - I was Sooo not disappointed! :D

I made this deliciousness after my dad requested a cheesecake or something similar since for the past few weeks I haven't made any fancy stuff, last week I made those evil.. EVIL brownies. And then my aunt made lots and lots of plain ol' cupcakes, and my dad well he likes his cheesecake!

Anyway something off topic, most of you may not be knowing this, but this month is a very special and holy month, its Ramadan (Involves fasting - and breaking the fast with lots and I mean LOTS of special deep fried dishes, but me well I'm a very good girl as I've been sticking with dates and fruits)!
OLYMPUS DIGITAL CAMERA

The recipe is adapted from Icebox pies by Lauren Chattman

Gianduia Pie

§ Ingredients:

Crust

1) 20 Fudge Wafer Bar Cookies

2) 1/2 cup hazelnuts, toasted and skinned

3) 1/4 cup unsalted butter, melted and cooled

4) 1 tablespoon sugar

5) 1/8 teaspoon salt

6) 1/2 teaspoon pure vanilla extract

Filling

1) 3/4 cup hazelnuts, toasted and skinned

2) 1 1/2 cup heavy cream, chilled

3) 1 teaspoon pure vanilla extract

4) 1 13 ounce jar of Nutella

§ Directions:

1) Preheat the oven 350°F. Place all of hazelnuts (1 1/4 cup) on a baking sheet. Bake for 10 minutes until they are fragrant.

2) Place the nuts on a clean kitchen towel and let cool for 10 to 15 minutes. Once cool, rub the nuts with the towel to remove the skin. A little skin won't hurt but try to remove as much as possible.

3) Make the crust: place the nuts and cookies in a food processor and grind finely. Combine the crumb and nut mixture, butter, sugar, salt, and vanilla in a medium size mixing bowl and stir until the crumb and nut mixture is moistened

4) Press the mixture evenly across the bottom of a 9-inch loose bottom pan, packing it tightly with your fingertips so it is even and compacted.

5) Bake the crust for 15-20 minutes until edges start to become firm. The crust will become more firm as it cools. Let cool completely before filling. The crust may be wrapped in plastic wrap and frozen for up to 1 month.

6) Make the filling: place 3/4 cup toasted and skinned hazelnuts in a food processor and process until very fine.

7) Combine the cream and vanilla in large mixing bowl. Using an electric mixer, whip the cream until stiff peaks form.

8) Place the Nutella in a medium-size mixing bowl and stir in one quarter of the whipped cream.

9) Gently fold the lightened Nutella mixture back into the remaining whipped cream. Fold in the chopped hazelnuts.

10) Scrape the filling into the prepared pie shell and smooth the top with a rubber spatula. Cover the pie with plastic wrap and refrigerate until the filling is completely set, at least 6 hours and up to 1 day.
OLYMPUS DIGITAL CAMERA

Friday, August 29, 2008

Sinister Brownies

OLYMPUS DIGITAL CAMERA

I saw the recipe for these oh so evil brownies at this wonderful blog called sugar plum. The minute I saw them I had no choice but to  try them out! Here's why, they started haunting me.period. Yes they haunted me in my day dreams at work (pssst.. that's where I discovered the recipe, when I was taking my well earned 10 minute break). They haunted me while I was at my daily 6k jog!

They are evil. They are rich. They are sooo unbearably delicious! You just want to keep 'em coming!

OLYMPUS DIGITAL CAMERA

Some pointless information regarding myself - since I will be going off to university in like 18 days or so ( I'm going to The university of Nottingham - Malaysia campus), I've been really busy accumulating very important necessities - like a french press to make really REALLy REALLLLLY frothy hot chocolate - OMG I'll tell you about that later). Anyway yesterday we got all the food thingies and beautifying equipment (lotion, potions..)! So I'm really happy about that - it makes it all so real! I never thought that my way overprotective parents will ever part with me - ever! But I guess the beautacious 'A' that I got in my A-level economics did the trick! :D

The recipe from sugar plum

Oreo Cream Cheese Swirled Brownies

  • Ingredients:

1) 1/2 cup (1 stick) unsalted butter

2) 3/4 cup granulated sugar

3) 8 ounces (1 package) cream cheese, softened

4) 3/4 cup confectioners' sugar

5) 2 teaspoons vanilla extract

6) 1 cup all purpose flour

7) 1/2 cup unsweetened dark cocoa powder

8) 1/2 teaspoon salt (scant)

9) 2 large eggs

10) 1 1/3 cups coarsely chopped Oreo cookies

  • Directions:

1) Preheat oven to 350 degrees F. Line an 8x8-inch square baking dish with foil; coat foil with cooking spray.

2) Melt the butter in a small saucepan, over medium heat. Whisk in sugar and bring to a boil, whisking frequently; boil 1 minute. Set aside to cool for 5 minutes.

3) In a small mixing bowl, using a mixer on medium speed, beat together cream cheese, confectioners' sugar and vanilla extract, until well combined, about 1 minute.

4) In a medium sized mixing bowl, sift together flour, cocoa powder and salt; whisk until combined.
In a large mixing bowl, whisk together eggs, until combined. Whisk in melted butter-sugar mixture until well combined. Stir in flour mixture until just combined, followed by Oreo cookies.

5) Spread half of brownie batter into baking dish, followed by cream cheese layer; dot the top with remaining brownie batter, and spread evenly, as best as you can. Run a knife through batter to make "swirls".
Bake at 350 degrees F, for 23-25 minutes (I kept mine in the oven for around 35 min because I thought they weren't done - but I should have taken them out earlier - well every body's gatsta learn somewhere)

6) Cool on a wire rack to room temperature before slicing. Lift foil out of baking dish, and slice into 9 bars. For easier slicing, try freezing the brownies for 30-60 minutes. ( I turned them out on a serving platter - BIG mistake! They got stuck to the plate - not stuck stuck, but you get the picture. I recommend you cut them in the pan then remove each beauty separately - you may notice the from the pictures that they are a somewhat disfigured, well this is the reason)
Yield: 9 brownies

OLYMPUS DIGITAL CAMERA